Showing posts with label tutorial. Show all posts
Monday, December 21, 2015
Last minute treats. {peanut butter fudge}
I love sweets, especially around Christmas-time. Especially around Christmas-time when I'm nursing and feel like I could eat 5000 calories a day. So when I was jonesing for a treat last week, I defaulted to my favorite layered fudge. I shared the super simple recipe for my mom's chocolate fudge here, but never shared the even simpler peanut butter fudge recipe. You probably have everything you need on hand right now and it is so peanut butter-y delicious. I hate the recipes that use peanut butter chips, they just don't taste right. But this one. Oh my goodness, its amazing.
And because I just can't leave well enough alone, I think its even better when layered with chocolate fudge. I forever want to kiss the person who first paired chocolate and peanut butter together. One of my heroes. I pour the pb fudge into a parchment lined dish and top with the chocolate fudge; refrigerate to set and voila! The tastiest and easiest fudge you ever made. Perfect for last minute treats to share with friends, take to family dinners, or {if you're like me} keep completely to yourself...
Peanut Butter fudge
2 stick butter
1 cup peanut butter
1 teaspoon vanilla
1lb powdered sugar
In large bowl, microwave butter and peanut butter for 2 minutes; stir and microwave for 2 more minutes. Stir in vanilla and powdered sugar; pour into 8x8 dish lined with buttered parchment paper. Chill in refrigerator for up to 2 hours to set {or top immediately with chocolate fudge before chilling!}. Cut and enjoy!
Wednesday, October 21, 2015
Granola bars. {recipe}
![]() |
| {image source- because I absolutely never make my bars look that awesome} |
So I've totally shared this recipe before. It's one of my favorites though and I made another batch last week to take to a family I love so much. Food, gifts, hugs, letters, quality time- those are my love languages. And I'm a creature of habit. I make the same recipes over and over to share with friends and put together a pretty cheesy gift basket for about any big life change my friends celebrate. It only seemed fitting that I bring this recipe out of the archives to share today. Especially since I sort of forgot about that batch in the oven I made last week and they got a little crispy. I'm whipping up another batch today to redeem those and I already can't wait to have these on hand for snacks the rest of the week!
These granola bars are so so good and simple to make. You probably already have everything you need for them in your pantry! I always change them up a bit based on what I have on hand {sometimes I'm out of coconut or add almond slivers instead of walnuts}. So basically, you can't go wrong with these. Unless you don't let them cool before you cut them. That's key!
Peanut Butter Chocolate Chip Granola Bars
What you'll need:
1 egg
1/2 cup peanut butter
1/3 cup honey
2 tbsp oil
1 1/2 tsp vanilla
3 1/2 cups oats
1/2 cup brown sugar
3/4 tsp salt
1/4 cup chopped walnuts {optional}
1/4 cup sweetened coconut {optional}
1/2 cup chocolate chips
Preheat oven to 350. In large bowl, mix together egg, peanut butter, honey, oil and vanilla. Set aside. In medium bowl, combine all dry ingredients except chocolate chips. Add dry ingredients to wet, mixing evenly. Add chocolate chips. Press mix into greased baking dish {I use a 9x13} and bake for 12-15 minutes or until edges are slightly browned. Cool completely before cutting into bars!
Wednesday, September 30, 2015
Fall favorites. {recipes}
If there is one time of year that makes me think of certain foods and recipes, its Fall. Hands down. I mean, pumpkin and apples. Need I say more? So I thought I'd share my three absolute favorites for this time of year.
Apple bars// I've blogged about these babies before and I have no shame about doing it again. They are that good. I've been eating these every Fall for as long as I can remember and as soon as apple season begins each year, I start looking for the first excuse to make them. Someone's birthday? Cooking club? Small group? Apples are on sale? I'm just hungry? All of those work. TRY THESE ASAP.
Pumpkin bread// Ok. I know everyone has a recipe for this. Gold star for us all. But the secret to the BEST EVER pumpkin bread is in how you bake it. You guys, if you have an oval {not circle} crockpot, you can make this. And you should.
Southwestern White Chili// I've adapted this over the years and it never turns out exactly the same {its one of those recipes}. But as someone who actually hates regular, red chili {sue me.}, I love having my own version while everyone else is freaking out about chili-season. I also dislike pretty much all beans, so I use my immersion blender to blend 2/3 of the beans in the broth and still have the flavor/thickness but none of the slimy bean-ness in the chili. Thanks for that tip, mom! And I love that this recipe is a bit spicy and has tons of flavor overall.
In crockpot, combine 1c chopped onion, 4 cloves garlic, 2tsp cumin, 1tsp oregano, 1/4tsp ground red pepper, 2 15oz can Great Northern beans {1-1.5 pureed}, 2 4oz cans diced green chile peppers, 4c chicken broth, and 3c cooked chicken {shredded}. Cover and cook on low for 7-8 hours or high for 3.5-4 hours. Stir in 8oz shredded Monterey Jack cheese before serving!
But seriously, I know I'm missing some Fall staples here. What are you favorite recipes that you break out every Fall? Share away!
Thursday, July 16, 2015
A quilt.
At least twice a week, I get asked about Caleb's baby blanket. So here you go!
| {see more shots of the quilt in all of Caleb's monthly updates!} |
After following a really simple pattern for my first two quilts {both for babies}, I knew I wanted to try something a little different for Caleb. And then I saw this photo floating around on Pinterest. I had to recreate it! While still an extremely simple pattern {probably easier than the other's I've made!}, I just love how it looks. I spent a few months collecting fabric, after choosing my color combo. I think from start to finish, this quilt took me maybe 2 afternoons? It was really so simple. About a week before Caleb was born, I started trying to sew his name on {we kept it a secret until his birth and I didn't want anyone stumbling on his blanket before he came!} and it looked HIDEOUS. Evidently I really don't know how to appliqué. And then he came early! So my sweet mom took the quilt and appliquéd his name for me. {thanks mom!} But other than that, easiest quilt ever. And so cute. Someone asked me the other day if I'm worried about the large white center getting stained. I'm not! Caleb used to spit up all the freaking time, and in all colors of the rainbow once he started eating real foods. But if he stains it, I just blot some bleach on. Of course I don't want the quilt to be ruined, but I don't want to pack it away never to be used. So instead, we use it all the time! A little wear and tear just adds character, right?
So, after a full year of being really loved {going on plane/car/stroller trips, keeping Caleb warm at night, catching lots of spit up and goldfish crumbs, and being washed regularly) it has held up perfectly! Still bright white!
I loved the pattern enough that I recreated it in fun colors for my new niece and will probably be recycling it again for other baby gifts {spoiler alert to all my expecting friends!}. But I'm on the hunt for a new fun pattern for baby number two, and can't wait to start once we find out the gender {8 days!!!!}
So, after a full year of being really loved {going on plane/car/stroller trips, keeping Caleb warm at night, catching lots of spit up and goldfish crumbs, and being washed regularly) it has held up perfectly! Still bright white!
I loved the pattern enough that I recreated it in fun colors for my new niece and will probably be recycling it again for other baby gifts {spoiler alert to all my expecting friends!}. But I'm on the hunt for a new fun pattern for baby number two, and can't wait to start once we find out the gender {8 days!!!!}
Friday, December 5, 2014
Joyeux Noel. {DIY}
I've been eying all those gorgeous rustic-ish wooden signs for a few years now, but never wanted to pay such a large price tag for one. And then I discovered Royal Design Studio's new Christmas collaboration with Jennifer Rizzo and I had my solution! You know I already love Royal Design Studio's stencils {have you seen Caleb's nursery here and here?}, and I absolutely love Jennifer's style. Have you seen her new book? It's full of ideas for decorating your home for Christmas- with real house tours. I'm swooning over all the gorgeous decor! Her stencil line is also gorgeous, and I had a hard time choosing which ones I wanted to try out. My favorites were the classic letters, garland border, and Santa reindeer stencils. They're each so versatile and I have at least half a dozen ideas on how to use them still floating in my head.
I started by spraying my board white {after cleaning it off a bit}. I fully planned on leaving it white. I started lightly tracing the letters to gauge spacing and to start lining them up to paint. But then I didn't love that spacing I chose, so I just painted over then entire board with some neutral chalk paint leftover from my bathroom makeover {I love chalk paint right now}. After some good sanding, I kind of fell in love with the accidental color- distressed and pretty! Then I simply lined up my garland stencils, taped it into place, and painted away! Chalk paint is perfect for stencil project because it dries so fast- so the wait time between each garland piece and letter wasn't very long. The rest of the project is pretty self explanatory, right? I painted the other side of the garland and then each letter, one by one. While I chose a more subdued red color and purposefully didn't keep my painting too clean, it was still a little too bright and simple for me. So I used more sandpaper to distress the whole sign some more until I had it just right. And then I immediately propped the sign on my mantel because I'm in love with it! So pretty! And cheap! And easy! All the exclamations!
It looks pretty perfect between some of my collected nutcrackers. Such a simple project, but I know it will be a Christmas staple around my house for lots of year. A little french wording to remind me of my Christmas spent in France during college and a pretty piece I love even more because I made it myself!
This is a sponsored post and I was given complimentary stencils from Royal Design Studio to review. All photos, opinions, and project ideas are 100% my own!
Monday, December 9, 2013
Go-to.
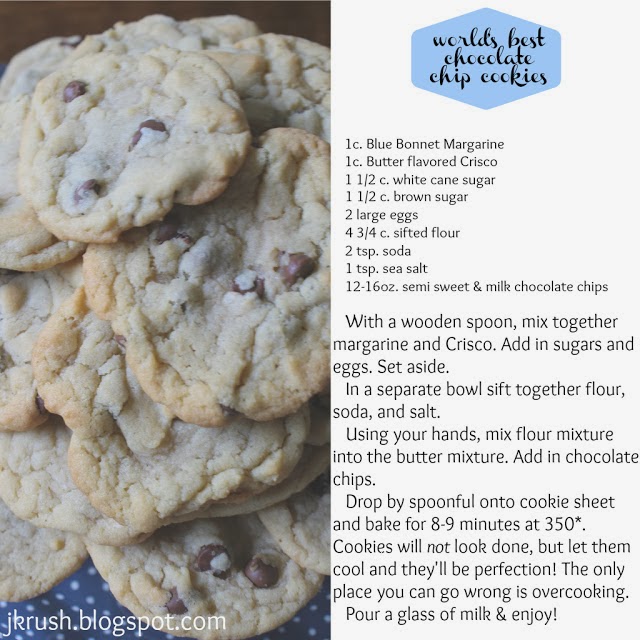
Anyways, it's basically prime time baking season right now. You probably have your stock of go-to recipes {do share!}, but if you're on the hunt for, seriously, the BEST chocolate chip cookie around, you must try this! I love it so much, I'm bringing it to my book club's cookie exchange tonight. {Sidenote: if that statement alone doesn't make me sound like a middle aged woman, I'm not sure what else would}.
Tuesday, November 26, 2013
Fudge.
I love to bake and cook. It's basically my love language, in addition to sending snail mail and long, drawn out hugs. I also love convenience and simplicity. My most favorite recipes are easy ones. Because, why make life more complicated than it has to be? Also, I love sharing recipes and who wants a longwinded, most likely to fail recipe handed to them? Nope. Short, simple, sweet!
I must have inherited this from my mom, because some of my favorite, tastiest, and most simple recipes come from her. Like this no fail fudge. So delicious. Who doesn't have 5 minutes for fudge?? So if you're looking for a last minute addition to your Thanksgiving meal or an easy staple to bring to any holiday get-together...make these!
Can't Fail 5-minute **{chocolate} Fudge
Small can of Carnation milk
1/2 tsp salt
6 oz chocolate chips (1/2 bag)
1 2/3 c. sugar
2 c. mini marshmallows
1 tsp vanilla
Heat milk, sugar, and salt to full boil. Boil for 5 minutes. Remove from heat and stir in remaining ingredients until thoroughly mixed. Pour into buttered dish; let cool.
**For our Friendsgiving this weekend, I was in the mood for chocolate and pb fudge, so I just layered the two. You could simply substitute pb chips in the recipe above, but I kind of hate fake pb. This is my go-to, favorite {and SUPER easy} pb fudge recipe!
Monday, August 5, 2013
Pound it.
I'm a creature of habit. I love trying new recipes and then adopting them into my rotation. I stumbled on this recipe earlier this summer, and have made it no less than 5 times since. Its so easy and delicious and doesn't require a literal pound of everything {because, gross}. Also, I think you could pile fresh berries and cream on top of cardboard, and it would taste amazing. So having extra tasty poundcake just skyrockets the same dish into the crapyourpants delicious category, right?
Monday, July 15, 2013
Bread and butter.
Who doesn't love warm, crusty bread right out of the oven?? {Even if you don't, go with it. Its a friendship deal breaker, for sure} Ever since reading Bread & Wine and trying Shauna's ahmazing Sullivan Street bread recipe, I've fallen back in love with baking breads. {I go through baking spurts- cookies, muffins, breads, granolas- you name it and I've been on a kick with it} And while I love the delicious Sullivan Street bread, it needs twelve hours to rise. TWELVE HOURS! Who has time for that? While on the hunt for a quicker, more realistic day-to-day bread, I ended up kind of making up a recipe from a few different I found. Less sugar {who wants sweet dinner bread??}, add in some garlic salt, cook in a random corningware, and convert some measurement from the metric system and- voila! So-easy dinner bread. Takes no time at all. Goes perfectly with our current dinner staple- garden fresh pesto chicken pasta. With extra pesto on the side for bread-dipping, of course. Also, round loaves of bread kind of blow my mind. So awesome. Thanks for the tip, Shauna!
Linking up here: Jam Hands, This Gal Cooks, Make Ahead Meals
Monday, June 3, 2013
A summer staple.
Grilling is a summer staple for us {and the rest of America?}, but getting Justin to eat more than mac'n'cheese, marinated chicken, or a burger is hard to do. I've been trying to find ways to sneak more vegetables into his diet, and I've landed on a new favorite recipe {probably more my favorite than his}. Hopefully by next month, we can use veggies from our garden. Wishful thinking? Maybe.
Thursday, May 30, 2013
Round-up.
Monday's post had me thinking that it would be fun to do a little round-up of some of my favorite tutorials from this little blog! I learned two things while I was picking my top 5; my picture taking abilities used to REALLY suck {now they just sort of suck} and I've got a buttload more recipes than tutorials to share. Hello, inner fat kid! :) In no particular order- here are my favorite crafty tutorials::
Tuesday, May 28, 2013
Fabric covered planter.
It might be safe to say that gardening is becoming a hobby for me. Nevermind that my entire garden got scorched last summer and I stopped watering it after July. I am fully embracing the 'fake it til you make it' motto and it may be working for me so far this summer? Too soon to tell. Either way, I'm having a blast growing my garden and watering my boxwoods and filling my planters with blooms that may or may not die in a few days. Watering time has become my jam. Like an 80 year-old woman, its the highlight of my evening. I kind of geek out over filling up my watering can I know, I know. Riveting life I live.
And now that I've completely drawn you into the the soap opera life I lead, let me share my fabric covered planter with you! Ha! What a segway. This is just about the simplest project and costs next to nothing. I scored this pot at Goodwill last year for $.25 and had everything else on hand. And I'm kind of obsessed with making these, so fake your surprise if you get one for a birthday or housewarming or no other good reason other than I love you. Mmkay?
What you'll need:
foam brush
mod podge
fabric
scissors
terra cotta planter
Start by coating the entire outside of the planter with a generous coat of mod podge and then quickly wrap the fabric. Since you kind of have to roll the fabric on, I've found its best to start with a larger piece of fabric than you'll need and then trim the excess. Make sense?
After you've wrapped the fabric around the outside, trim the top while leave about 1 1/2 in extra {or however much you'll need to have the fabric fold past the soil line}. You want the inside of the pot to seem lined, too, so cut diagonal slits in the fabric to fold into the pot.
Coat the inside with a layer of of modpodge and fold the fabric inside...
...and go over with another coat of modpodge.
Now smooth as many wrinkles out as possible on the outside of the planter and add a last generous coat of modpodge. Trim the bottom of the fabric and modpodge to seal.
Let the pot dry completely before planting. I'm sure there's some sort of waterproof or outdoor modpodge available, but I'm all for using what you have. So, be prepared for your planter to become a bit soggy when watering your flowers. No worries though, it seals up just fine after it dries again.
Et voila! Isn't it cute? I kind of love that its imperfect with some of the wrinkles I couldn't/was too lazy to get out. I chose a more basic fabric, but the possibilities are endless. And hey, if my plants end up dying, at least I have a cute pot out of the deal! Silver lining, people.
Tuesday, May 14, 2013
In the kitchen:: Pizza bites.
On a completely different note than yesterday, I have a favorite recipe to share! I've probably mentioned it a hundred times, but I'm a creature of habit. Especially when it comes to food. I love trying new recipes, but always with the hopes of finding a new favorite staple. This recipe is one of those. I have made these pizza bites probably 15 times over the last 3 months. No joke. These are dee lish ush. They don't look like anything special and everyone is a little hesitant to dive right in, but once they do- the bites are gone in minutes. There are two things that set these puppies apart from any other recipe I've seen or tried for pizza bites. I quickly substituted bread dough {this is my favorite! We also use it for stromboli} for pizza dough. Much fluffier and less flaky. You also cannot skimp on the olive oil seasoning. The garlicky, parmesan-y, olive-y goodness seals the deal here, people. You can get crazy and use whatever pizza toppings you want, but I would keep it simple. And, well, I do. I always stick with pepperoni and mozz. Yum!
Tuesday, May 7, 2013
Knock off.
Who doesn't love the ever popular Anthro Homegrown Monogram mugs? But they're so homemade-ish, I knew I could make a knock-off. And what better excuse than Mother's day?! A trip to Goodwill, a shipment of some lovely Martha Stewart Craft goodies {eek!}, and a bit of handiwork later- and I'm in love with the finished project. Add a little flower, and you have the cutest Mother's Day gift or brunch place-setting.
For this project, you'll need a white ceramic mug, Martha Stewarts large paisley silkscreen, adhesive letter stencil, brush, and all purpose acrylic paint. All of these lovely supplies can be picked up at your local Michael's.
What I love about these silkscreens & stencil is their adhesiveness. It makes applying the paint so much simpler. I did notice, however, that the more I used my silkscreen and rinsed it off {I made two mugs}, it lost some of its stickiness. The adhesive letters worked great, though!
Start by wrapping the silkscreen around the mug. Wrap tightly and work out bumps so the paint goes on smoothly.
Paint a layer of acrylic over the silkscreen. Slowly remove the stencil and wipe any smudges with a wet cloth. Let the paint dry, and then reposition the stencil/repeat until the mug is covered with the print.
After the entire print is dry, evenly position the monogram.
Paint and slowly remove the stencil.
Et voila! Isn't the print lacey and lovely?
To add a bit of pop, I picked up a baby geranium and planted it in the mug. Adorable? Yes.
And since I'm posting this days before Mother's Day, the cat's out of the bag. Guess you know what you're getting, sisters! :)
full disclosure:: This post was written as part of Blueprint Social and Plaid's Mother's Day campaign. I got some free stuff, but absolutely all the opinions and love for Martha's gorgeous craft supplies are all mine.
Subscribe to:
Posts (Atom)