Showing posts with label recipe. Show all posts

Monday, December 21, 2015

Last minute treats. {peanut butter fudge}


  I love sweets, especially around Christmas-time. Especially around Christmas-time when I'm nursing and feel like I could eat 5000 calories a day. So when I was jonesing for a treat last week, I defaulted to my favorite layered fudge. I shared the super simple recipe for my mom's chocolate fudge here, but never shared the even simpler peanut butter fudge recipe. You probably have everything you need on hand right now and it is so peanut butter-y delicious. I hate the recipes that use peanut butter chips, they just don't taste right. But this one. Oh my goodness, its amazing.
  And because I just can't leave well enough alone, I think its even better when layered with chocolate fudge. I forever want to kiss the person who first paired chocolate and peanut butter together. One of my heroes. I pour the pb fudge into a parchment lined dish and top with the chocolate fudge; refrigerate to set and voila! The tastiest and easiest fudge you ever made. Perfect for last minute treats to share with friends, take to family dinners, or {if you're like me} keep completely to yourself...

Peanut Butter fudge
2 stick butter
1 cup peanut butter
1 teaspoon vanilla
1lb powdered sugar

  In large bowl, microwave butter and peanut butter for 2 minutes; stir and microwave for 2 more minutes. Stir in vanilla and powdered sugar; pour into 8x8 dish lined with buttered parchment paper. Chill in refrigerator for up to 2 hours to set {or top immediately with chocolate fudge before chilling!}. Cut and enjoy!

Wednesday, October 21, 2015

Granola bars. {recipe}

  
{image source- because I absolutely never make my bars look that awesome}


  So I've totally shared this recipe before. It's one of my favorites though and I made another batch last week to take to a family I love so much. Food, gifts, hugs, letters, quality time- those are my love languages. And I'm a creature of habit. I make the same recipes over and over to share with friends and put together a pretty cheesy gift basket for about any big life change my friends celebrate. It only seemed fitting that I bring this recipe out of the archives to share today. Especially since I sort of forgot about that batch in the oven I made last week and they got a little crispy. I'm whipping up another batch today to redeem those and I already can't wait to have these on hand for snacks the rest of the week!
  These granola bars are so so good and simple to make. You probably already have everything you need for them in your pantry! I always change them up a bit based on what I have on hand {sometimes I'm out of coconut or add almond slivers instead of walnuts}. So basically, you can't go wrong with these. Unless you don't let them cool before you cut them. That's key!


Peanut Butter Chocolate Chip Granola Bars

What you'll need:
1 egg
1/2 cup peanut butter
1/3 cup honey
2 tbsp oil
1 1/2 tsp vanilla
3 1/2 cups oats 
1/2 cup brown sugar
3/4 tsp salt
1/4 cup chopped walnuts {optional}
1/4 cup sweetened coconut {optional}
1/2 cup chocolate chips

Preheat oven to 350. In large bowl, mix together egg, peanut butter, honey, oil and vanilla. Set aside. In medium bowl, combine all dry ingredients except chocolate chips. Add dry ingredients to wet, mixing evenly. Add chocolate chips. Press mix into greased baking dish {I use a 9x13} and bake for 12-15 minutes or until edges are slightly browned. Cool completely before cutting into bars!

Tuesday, August 4, 2015

Popsicles.


  Have you ever seen a kid so excited about popsicles? I can't blame him. The past few weeks have been hot and we're doing anything to keep cool around here. And these perfectly-size popsicle molds from NUBY have been our lifesavers this summer. I just blend up whatever fruit we have on hand with a tiny bit of water and pop them in the freezer for an afternoon snack. So easy! Today I blended up some watermelon and they are probably my favorite so far. But really, I won't be sad if the cooler fall temps decide to push out these 90° days...

Disclosure: I received Nuby products for this post, but all opinions are my own.  We love Nuby in our house, and I’m excited to introduce you guys to all the great stuff they have for little ones!
Follow along with Nuby! //Facebook //Twitter //Instagram //Pinterest

Wednesday, July 22, 2015

Summer on the table.


  One of the best parts of summer is being able to easily find fresh foods. Berries, greens, watermelons- all things that are harder {and more expensive!} to find during the winter months in Indiana. When I realized it was my chance to host cooking club this month, I knew I wouldn't actually cook anything and that we would definitely NOT be having chicken {my biggest pregnancy aversion}. So I opted for this light summer salad and really simple watermelon slush. You guys, not to be dramatic or anything, but if you could put summer on a table, this is it. 


  They're both extremely basic and you could probably recreate them with what's already in your fridge. The salad is such a hodge podge- you could mix it up with candied nuts or feta cheese. We added some sautéed shrimp {all the seafood for me right now, thankyouverymuch}, but you could add grilled chicken or go completely meatless, too. 

  
{Summer salad: Spring greens, strawberries, blueberries, raspberries, avocado, toasted almond slivers, goat cheese crumbles, raspberry vinaigrette}

And this slush. You literally just need a watermelon, lime, and sugar. Yes, yes, yes. There's a 100% I made myself an entire pitcher again today because I love it so much. I may or may not decide to share with Caleb and Justin...

{Watermelon slush: 5 cups cubed watermelon, juice from half lime, 2 tbsp sugar, 2 cups ice- blended}

  So I'll officially be eating/drinking these on repeat until Fall. What summer recipes are you loving right now? 


Wednesday, April 1, 2015

A sweet potato recipe.


  My biggest takeaway from Whole30 was finding food and meals I didn't think I liked before, but came to love. Like sweet potatoes and zoodles and eggs and flaxmeal. I don't think that I need to maintain a 100% Paleo diet, but have loved incorporating lots of those habits into my day to day eating. I read more labels and stay away from foods with added sugar. I eat less grains, BUT I AM NOT AND WILL NOT GO GLUTEN FREE. I make pretty much every meal from scratch, using fresh ingredients. When I go to the grocery store, 90% of what's in my cart is from the perimeter of the store.
  But anyways, I'm getting off track. Let's talk about sweet potatoes. I've always heard they're great for you, but I used to think they could only be eaten sweet. And I have a strict 'sweets are for dessert only and if it's a fruit/veggie, it's a crappy dessert' policy. BUT I learned how to make them savory and delicious and now I could eat them every single day. My favorite way to prepare them? As fries! If it's a good week, I take time on Sunday to slice up a few potatoes so I can grab a handful to bake as a snack or for a side. We made them last night and found out Caleb is also a huge fan! In case you're looking for a new recipe, YOU HAVE TO TRY THESE. And yes, I'm sort of yelling at you because I love this recipe so much. You're welcome.


Savory Sweet Potato Fries
Servings: 2
Prep time: 25 minutes
Cook time: 20 minutes

  Slice one large sweet potato into thin, shoestring fries {I think this is essential and worth the hassle! The come out a little bit crispy}. Toss in olive or coconut oil {1-2 tbsp}. Mix 1 tbsp sea salt, 1 tbsp paprika, 2 tsp pepper, 2 tsp garlic powder {adjust amounts according to amount of fries/preference}. Toss fries in half of seasoning, and then repeat to coat evenly. 
 Cover two baking sheets with parchment paper; spread fries evenly between the baking sheets in a single layer. Bake at 450 for 15-20 minutes, flipping fries halfway through. Serve immediately. SO GOOD!!

Wednesday, August 20, 2014

Light & Easy {pulled pork}.


  We've been getting in the swing of cooking real meals again {post pregnancy nausea, husband's health kick, then postpartum meals from friends}. It's really been months since we've been in a routine of menu making- probably since before I found out I was pregnant. Sad, I know! Anyways, since I'm home all day now and have the time and motivation to do so, we're back to menu making! This week I was on the hunt for some new recipes to add into our mix, and I think I landed on a new favorite. Easy and healthy pulled pork! And it's a crockpot recipe, so that's a win for sure. Who doesn't love the whole set it and forget it thing? 
  I've never made pulled pork before and really wanted something easy. We're also trying to watch our waistlines around here, so something a little lighter was a definite must. I couldn't find one recipe that I loved, so I just combined parts of this one and this one to make my own. And since there are only two of us, I cut it down to a smaller recipe that serves two and leaves room for leftovers. Enjoy!
  What recipes are you loving right now? I'm always looking for new ones to add to my lineup! 


Ingredients::

  • 1-2 lbs pork boneless pork loin roast (center cut, trimmed of all fat)
  • 1/2 onion
  • buns or Kaiser rolls
  • 1 cup ketchup
  • 1/3 cup Worcestershire sauce
  • 1 tsp chili powder
  • 1 tsp salt
  • 4 dashes Tabasco
  • 1 1/2 cups water


  Slice onion and place at bottom of crockpot. Season pork loin with salt, pepper, and garlic powder on all sides. Place on top of onions in crockpot and cook on low for 6-8 hours or until tender and pulls apart easily. Be sure not to overcook! An hour before you want to eat, mix ketchup, Worcestershire, chili powder, salt, Tabasco, and water in saucepan and heat to boiling. Boil for one minute and set aside. Remove pork from crockpot and shred. Drain liquid from pot, reserving onions. Combine onions and shredded pork in crockpot, pour 1 cup of sauce over top and combine. Cover and cook 30-45 minutes. Use extra sauce to serve on side!

Tip: A few minutes before we sit down to eat, I like to turn the oven on broil and toast our buns. {ha...toast our buns!} 

Monday, December 9, 2013

Go-to.


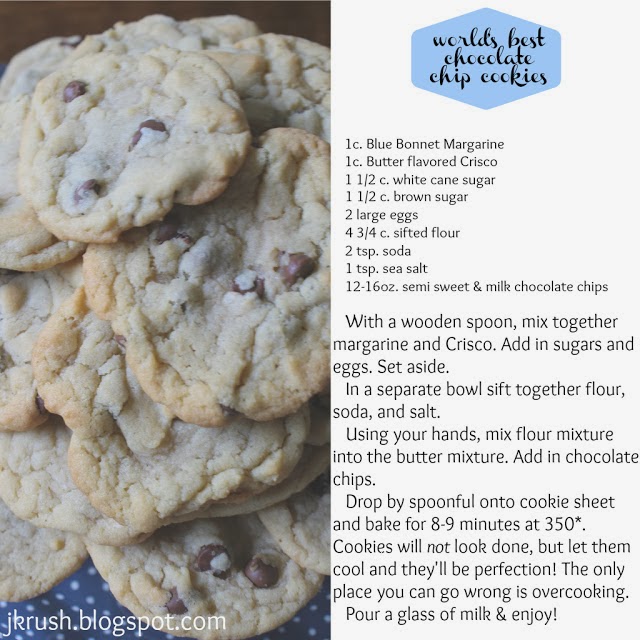
   I know I've shared this recipe before, but if its good- it must be shared again. Our first year of marriage, I was on the hunt for the best chocolate chip cookie recipe. I must have tested a dozen before landing on this gem from a co-worker. I literally use the crumpled, butter stained printed email from her every time I bake these. And {cheese alert} think back to what a sweet time our first year of marriage was. 
  Anyways, it's basically prime time baking season right now. You probably have your stock of go-to recipes {do share!}, but if you're on the hunt for, seriously, the BEST chocolate chip cookie around, you must try this! I love it so much, I'm bringing it to my book club's cookie exchange tonight. {Sidenote: if that statement alone doesn't make me sound like a middle aged woman, I'm not sure what else would}.


Tuesday, November 26, 2013

Fudge.


 I love to bake and cook. It's basically my love language, in addition to sending snail mail and long, drawn out hugs. I also love convenience and simplicity. My most favorite recipes are easy ones. Because, why make life more complicated than it has to be? Also, I love sharing recipes and who wants a longwinded, most likely to fail recipe handed to them? Nope. Short, simple, sweet!
   I must have inherited this from my mom, because some of my favorite, tastiest, and most simple recipes come from her. Like this no fail fudge. So delicious. Who doesn't have 5 minutes for fudge?? So if you're looking for a last minute addition to your Thanksgiving meal or an easy staple to bring to any holiday get-together...make these!

Can't Fail 5-minute **{chocolate} Fudge

Small can of Carnation milk
1/2 tsp salt
6 oz chocolate chips (1/2 bag)
1 2/3 c. sugar
2 c. mini marshmallows
1 tsp vanilla

  Heat milk, sugar, and salt to full boil. Boil for 5 minutes. Remove from heat and stir in remaining ingredients until thoroughly mixed. Pour into buttered dish; let cool. 

**For our Friendsgiving this weekend, I was in the mood for chocolate and pb fudge, so I just layered the two. You could simply substitute pb chips in the recipe above, but I kind of hate fake pb. This is my go-to, favorite {and SUPER easy} pb fudge recipe! 

Monday, August 5, 2013

Pound it.


   I'm a creature of habit. I love trying new recipes and then adopting them into my rotation. I stumbled on this recipe earlier this summer, and have made it no less than 5 times since. Its so easy and delicious and doesn't require a literal pound of everything {because, gross}. Also, I think you could pile fresh berries and cream on top of cardboard, and it would taste amazing. So having extra tasty poundcake just skyrockets the same dish into the crapyourpants delicious category, right? 


Monday, July 15, 2013

Bread and butter.


  Who doesn't love warm, crusty bread right out of the oven?? {Even if you don't, go with it. Its a friendship deal breaker, for sure} Ever since reading Bread & Wine and trying Shauna's ahmazing Sullivan Street bread recipe, I've fallen back in love with baking breads. {I go through baking spurts- cookies, muffins, breads, granolas- you name it and I've been on a kick with it} And while I love the delicious Sullivan Street bread, it needs twelve hours to rise. TWELVE HOURS! Who has time for that? While on the hunt for a quicker, more realistic day-to-day bread, I ended up kind of making up a recipe from a few different I found. Less sugar {who wants sweet dinner bread??}, add in some garlic salt, cook in a random corningware, and convert some measurement from the metric system and- voila!  So-easy dinner bread. Takes no time at all. Goes perfectly with our current dinner staple- garden fresh pesto chicken pasta. With extra pesto on the side for bread-dipping, of course. Also, round loaves of bread kind of blow my mind. So awesome. Thanks for the tip, Shauna!


Linking up here: Jam Hands, This Gal Cooks, Make Ahead Meals

Tuesday, July 9, 2013

Boozy lemonade.


   One of my goals for June was to find a great sorbet recipe. And I did, sort of. Full disclosure? I didn't even try to make actual sorbet. I kind of forgot. But, I was introduced to the most amazing boozy summertime drink by my friend Kathleen. Which has sorbet vodka in it, so basically, I made sorbet right? Right. Oh em gee, this stuff is delicious. {you know it has to be if I actually just wrote out oh em gee} 
   I pretty much always have a pitcher of pink/strawberry lemonade in my fridge during the summer. I don't drink pop or sweet teas or any of that jazz, so this is my one sugary drink indulgence and I love it. Add some delicious berry, sorbet-y vodka and it is So. Good. You can't even taste the alcohol and I'm known for making strong drinks. 
  Moral of the story, try it asap. And thank me later! Cheers!! 

Monday, June 3, 2013

A summer staple.


  Grilling is a summer staple for us {and the rest of America?}, but getting Justin to eat more than mac'n'cheese, marinated chicken, or a burger is hard to do. I've been trying to find ways to sneak more vegetables into his diet, and I've landed on a new favorite recipe {probably more my favorite than his}. Hopefully by next month, we can use veggies from our garden. Wishful thinking? Maybe. 


Tuesday, May 14, 2013

In the kitchen:: Pizza bites.


  On a completely different note than yesterday, I have a favorite recipe to share! I've probably mentioned it a hundred times, but I'm a creature of habit. Especially when it comes to food. I love trying new recipes, but always with the hopes of finding a new favorite staple. This recipe is one of those. I have made these pizza bites probably 15 times over the last 3 months. No joke. These are dee lish ush. They don't look like anything special and everyone is a little hesitant to dive right in, but once they do- the bites are gone in minutes. There are two things that set these puppies apart from any other recipe I've seen or tried for pizza bites. I quickly substituted bread dough {this is my favorite! We also use it for stromboli} for pizza dough. Much fluffier and less flaky. You also cannot skimp on the olive oil seasoning. The garlicky, parmesan-y, olive-y goodness seals the deal here, people. You can get crazy and use whatever pizza toppings you want, but I would keep it simple. And, well, I do. I always stick with pepperoni and mozz. Yum!


Wednesday, April 24, 2013

A current fav.


   I really, really love cooking and baking. I know it's super stereotypical and very pinterest-y, but it's true. I was always the one begging to help my mom make banana bread or learn how to make my own supper growing up. I've had a Family Circle subscription for the last four years. I'm not sure home much more cooking/baking-nerdy you can get than that one. Family Circle, people. I'm 26. Yup.
  But over the last couple of years, Justin and I have had opposite schedules. So making meals has been trickier and really, less frequent. Cooking for one is no fun. When we do cook, we stick with favorites. And repeat them a lot. This recipe is one of those favorites. Chicken is our go-to meat. I don't like red meat and he hates fish. Chicken it is. We have a favorite spicy bbq marinade, but have been switching it up lately. 
  This is one of those marinades that is and So. Full. Of. Flavor. I use parmesan to make it thicker, which seems to help it stick to the chicken so much better than bread crumbs. Its also one of those 'just eye it' recipes. I probably use a different amount each time I make it.

1 lb.     chicken tenderloins
3 tbsp    grated parmesan
1 tbsp    Montreal steak seasoning
1 1/2 tsp garlic powder
1 1/2 tsp onion flakes
1 1/2 tsp oregano

  Place tenderloins in a smallish container or plastic baggie {very specific, right?} so that they are packed in an able to soak up the marinade. Add all the marinade in with the chicken and stir to mix. The parmesan should act as a thickener and help the mixture stick to the chicken. Chill if you have time, or bake immediately. I like to prepare this a day ahead {just to save time}, but it tastes just as good if you make right away! After baking, I usually set the tenderloins on a cooling rack so that the bottoms aren't super soggy. Enjoy!

 I'm dying to know. What are your go-to recipes? You know, the ones that work themselves into the weekly rotation. The ones you know by heart. I'm always looking for new, better recipes! 


Thursday, March 14, 2013

Fried rice.


  Growing up, our house was what you would call 'meat and potatoes'. I'm not sure I had ever eaten raspberries or avocados or indian food until college- so the fact that I like (and make!) dishes like fried rice, loaded with veggies, is huge. Its become a staple for us lately- we love it! I made a huge batch last night for the rest of our work lunches this week, posted a pic on instagram, and thought I'd share my recipe. Guys, it so easy. Here it is! But be sure to read my tips below...


  What I love about dishes like this is that you can change it a million ways and have it still turn out delicious. Different preferences, what you have on hand, and time available may call for some adjustments. Here are some of the random things I add/do::

- Rice. Sooo I never cook the rice in advance. Its ideal to have day old, cold rice from the fridge to add- but I'm never prepared. Instead, I cook the rice according to the package (usually while I'm cooking a couple frozen chicken breasts, since I don't preplan that, either). When the its done, I put into a large container and throw in the freezer while I cook the eggs and veggies. This makes it firm up a bit and be just the right texture. (I should mention we always use brown rice!)

- Eggs. We love lots of egg in our fried rice so we use 4, but you could totally use less (or more!).

- Veggies. I love that I can use frozen veggies for this- my favorite mixes are both from Trader Joe's. I usually add one cup Harvest Hodgepodge and one cup Stir Fry veggies. With both, I get a mix of soy beans, snow peas, onion, carrots, mushroom, broccoli, sprouts- good stuff. You can adjust the amount of veggies to your liking.

- Serving sizes. I find that when I prepare 1c of uncooked rice, it comes out to a bit more than 3c cooked. I usually have more than I need, and throw that in the fridge to use for a small batch of stir fry or fried rice later. You may find you want to use more/less rice.

  Let me know if you try it! And any tweaks/change you make...I'm always looking for improvements :) 

{Linking up here: Stories of AtoZ, Under the Table and Dreaming, Young & Crafty}

Wednesday, February 20, 2013

Pizza grilled cheese.

Allison is one of my go-to recipe & lifestyle bloggers! I love how honest she is and she is always coming up with the yummiest recipes and telling the best stories :) Go check her out asap!

Hi there wonderful friends of Katie. I'm Allison and I blog over at Nestful of Love where I blog about my life as a teacher, wife, furbaby mama, Etsy shop owner and Pioneer Woman fanatic. Since many of my adventures involve cooking I thought I'd share a recipe with you today. If you love grilled cheese and you love cheap and easy meals you will LOVE this! Since we are on a budget in our house I was trying to think of cheap meals and this recipe definitely won me over.


Here's what you need to make 2 sandwiches:
-4 slices of mozzerella cheese
-Pepperoni (cut in half of mini's)
-4 slices of bread
-Butter (enough to cover the top halves of 4 slices of bread)
-Italian Seasoning


Start by buttering the tops of all 4 slices of bread
Place 1 slice of bread (butter side down) on a warm skillet on medium high heat
Add one slice of mozzarella to the top of the bread
Sprinkle desired amount of Italian seasoning and pepperoni on top of cheese
Cover with another slice of mozzarella and second piece of buttered bread
Wait until bread is golden brown then flip over carefully to brown the other side
Repeat with second sandwich

Serve warm, use pizza sauce to dip in!
Hop on over to my blog and let me know if you try it!

Monday, February 18, 2013

Easy lazy day cookie bars.

Have I mentioned how thankful I am for this blog break and some really wonderful blog friends who are guest posting for me while I'm out? So thankful. Jenny is no exception. I love this girl. She has a heart of gold and such a beautiful resilence- even when life gets really, really hard. Love her. Can't say it enough :)  
Hey y'all! I am Jenny and I blog over at Strickly Stricklands! I am so happy to be guest posting today for Katie as she enjoys some time off from blogging! We have become close blog friends over the last 6 months and I just adore her!  Katie is a sweetheart and I admire her strong faith in the Lord! 

Today I am going to share a super easy recipe for some delicious cookie bars! The original recipe calls them lazy day cookies, but after making them a couple of times and changing up the recipe some, I renamed mine Easy Lazy Day Cookie Bars!

I am a big sweet eater! I like to have something sweet on hand for those cravings I get! Usually you can find me in my kitchen on Sunday afternoon baking up a storm! As much as I love my KitchenAid mixer,  there are some days I don't want  drag it out or spend the afternoon baking. One day I found this recipe for Lazy Day Cookies. It looked simple enough to throw together without messing up that many dishes.

Easy Lazy Day Cookie Bars
1 box yellow cake mix
2 eggs
6 Tablespoons butter, melted
1 Tablespoon water (if needed add more)
1 cup milk chocolate chips
2 small bags of M&Ms (or half of a large bag)
  
Preheat oven to 350 degrees. Melt butter in the microwave. While butter is melting get your other bowl ready by pouring in the cake mix, 2 eggs, water, chocolate chips & M&Ms. Don't mix yet! Once butter is melted add to the other ingredients. Mix well. The butter will melt the chocolate chips and M&Ms some but that is ok! (to me this is what made them so good!) Pour into a greased 9x13 dish or 2 brownie pans and bake at 350 degrees for 20 - 25 minutes. Slice into bars and enjoy!

I changed a few things with the recipe. I've made them by my recipe twice now and loved the way they turned out and by the original recipe one time but didn't like them at all. Play with the recipe. If you don't like chocolate chips or M&Ms then add what you want! I think that next time I will add in some chopped pecans. You can even use a different type of cake mix!The possibilities are endless! They don't really have the consistency of cookies nor do they have the consistency of cake. Its weird to explain. The best way I can describe it is that they taste like the cookies cakes you can get Great American Cookie! They are delicious right out of the oven but I found that they are even better once they have cooled down and a few days after baking!  

Let me know if you make these and what combinations you use!!! Happy baking!

Wednesday, January 16, 2013

Kay-suh-dill-uh.


Justin and I have gotten back into eating healthy over the last few months {funny how easy it is to get out of that habit!} and one of the things we've been doing is buying some frozen entrees. Say what you will, but those things are so convenient. Especially when you don't want to cook for one, are pressed for time, and on completely different schedules than your spouse. But it irks me every time I nuke one of those meals...because I know for a fraction of the price and little time in the kitchen, I can make something just as delicious. One of my fav frozen entrees were these yummy breakfast quesadillas. But I knew I could easily make my own, and have breakfast for a week- for the same price as two pre-made quesadillas. So I did!

And they were a success!!! So I thought I'd share my recipe...they're so good, easy to make, and pretty darn healthy to eat.

Cook 3 strips of bacon {I prefer turkey bacon!}, let cool. In the same pan {you know, because everyone loves that bacon flavor!}, make a large batch of eggs. I only like egg whites and ended up using about 5 for this recipe. In a bowl, mix cooked eggs, shredded bacon bits, 1/4 cup cheddar cheese, and some diced green and red pepper. Lay out tortilla {I used 5 for this recipe} and spoon mixture evenly into each. Cook each quesadilla, one at a time, in the same skillet. Let cool for 10 minutes and wrap individually in foil. Freeze for up to two weeks. 
To prepare, microwave individual quesadilla for 2 minutes, flipping every 30-45 seconds. 

Enjoy! :) 

Tuesday, October 9, 2012

Apple bars.


There's a lot I love about this time of year, but one of my absolute favorite things about Fall is having a constant batch of apple bars sitting on my kitchen counter.
My mom used to make these when we were little, and I've yet to share the recipe with someone who didn't absolutely love them.
I used to favor them fresh out of the oven, but Justin's got me hooked on eating them cold. They kind of set into this carmel-like state and it is absolute deliciousness!
Make some. Send me pictures. Thank me later :)


My Mama's Apple Bars. 

1c. vegatable oil
1 3/4 c. sugar
3 eggs
2t vanilla
2c. flour
1/2 t. salt
1t baking soda
2t cinnamon
2c diced/peeled apple (I usually just use 2 medium tart apples and don't bother with measuring!)

Mix together oil, sugar, eggs, and vanilla. Mix well. Add flour, salt, soda, and cinnamon. Fold in apple. Spray bottom only of 13x9in pan with cooking spray. Pour in batter. Bake at 325 for 45 minutes (My oven is HOT and I only need to cook for about 35 min...so keep an eye on the bars if your oven's cooks faster/slower). Middle will look under baked, edges will be brown. Bars will firm as they cool.
Enjoy!


Friday, August 10, 2012

Sunshine.


We could all use a little sunshine in our lives, right?
I've found, for me, one of the best pick-me-ups is to love on others.
Gifts, packages, notes, voicemails, and long hugs for others bring a lot of sunshine into my heart.
And those things have never more important to me as they have in the last weeks

I was finishing up a birthday package for one of my heart friends, Lauren
{Who recently moved to Denver for this amazing venture!}
And I wanted to a bit of sunshine.
So I looked through my cupboards and decided to make a cookie mix in a jar for her.
Sunshine cookies, to be exact!
Have you had those?
Ohemgee. They're so good. 


Just so we're keeping it real here, I want to point out how unperfect this little project was. 
I'm sure by now you know for certain I am anything but perfect,
but I think I need to make sure I work on telling the whole story.
Even just when it comes to a simple little cookie mix in a jar.

So, I used what I had for this. I didn't want to go scouring for a perfect jar. I also thought of putting another cookie mix in there, but I didn't want to have to go spend more money on ingredients than I needed to.
{Lauren, my cheapness doesn't reflect my love for you! :D}
So I used a jar I'd been saving. It was cute, but definitely too small.
I used chalkboard paint I had on hand to create the 'label'. 
And, as you can see, my chalk writing definitely needs some work.
I like to think it adds character. No? :)
Next, I piled in the ingredients.
And PACKED them all down. 

Only too find out...

Right. My jar was WAY too small. So I improvised. I included the M&M's in a packet tied to the jar and labeled them 'bits of sunshine'. Cute, but unplanned. And then I really just put the sugar in a baggie with that tag. Classy, I know.
I think Lauren loves me still. 

All this to say, I'm not perfect.
I'm far from a craft genius.
But I love my friends.
And I'm pretty sure they love me through my imperfectness. 
You know, just as Jesus does. 


Ps. I still have 2 FREE small ad sponsor spot available! And 2 FREE large ad spots...more details here

{linking up with Christina for 20 Below!}